Securing Shiny apps with AWS Cognito authentication
Background
Shiny apps are a great way to share information and empower your users. Sometimes you want to make sure that only authenticated and authorized users will be able to view your shiny apps.
There are a number of ways to make sure only certain users have access to your apps. For example, you can subscribe to the professional plan in shinyapps.io which has this option built-in. You can program the authentication flow internally by yourself, or you just use a 3rd party service such as google firebase, AWS Cognito, Auth0, or others).
The benefit of using a dedicated service is that you get a lot of features which will be a serious headake to program yourself, such as social logins, two factor authentication, logs, and user blocks on suspicious attempts (or warnings on unauthorized attempts, depending on settings).
The down side is that it takes some time to implement. In this guide I aim to make the process as simple and painless as possible, using the Amazon Web Service’s authentication solution, called AWS Cognito. But first, some theory about authentication.
How authentication works
The logic behind authentication with AWS Cognito (or similar alternatives) is that you direct your users to a login page hosted by AWS, in which the user completes a process which confirms the user’s indentity. For example, by entering an e-mail and password, or by using a social sign-in (i.e., login via gmail, amazon, facebook). Then, once Cognito is finished, the user is redirected to your app with a URL variable which contain a specially issued code (i.e., https://your-app-address/?code=AMAZON_ISSUED_CODE.
Then, you use an http request (i.e., with package httr) to query the Cognito API with this code, and in return you receive the information behind this code (i.e., the user’s token, with information such as the name of the user, what is the user’s email, validity of the token, etc.). This httr query is performed by using a password known only to you (i.e., only your app “knows” this password, this is not the user’s password).
The code is usable only once, and the token is valid for a limited duration, to minimize the risk that an unauthorized party will hijack the token and re-use it to access your app.
After authenticating the user, you can authorize the user according to privileges (which you would have to manage within your app, i.e. if the users email is X, then he can view Y).
This process description was a very simplified, down-to-earth, nutshell description of oauth2. It might be inaccurate, but it will be enough for our goal here which is to actually implement it within a shiny app, integrating to Cognito. If you wish, you can find more information about oauth2 in detail here.
Let’s get to business.
Step 1: Define a user pool
This step is actually performed within the AWS Console. Log into your AWS console and find the Cognito service. Click on “Manage User Pools”, and then create a new user pool. The step-by-step wizard is pretty self explanatory, so I’ll focus on the important things:
- Make sure that you require a relevant field upon your user sign-up which you can “count on” in order to perform user authorization within your app based on that field later on. I usually check the email address as a required field, and then add logic in my app which maps email addresses to what each user is allowed to view.
- Multi-factor authentication can be “off”, “optional” or “required”. If your app contains sensitive information, then you should consider making it required.
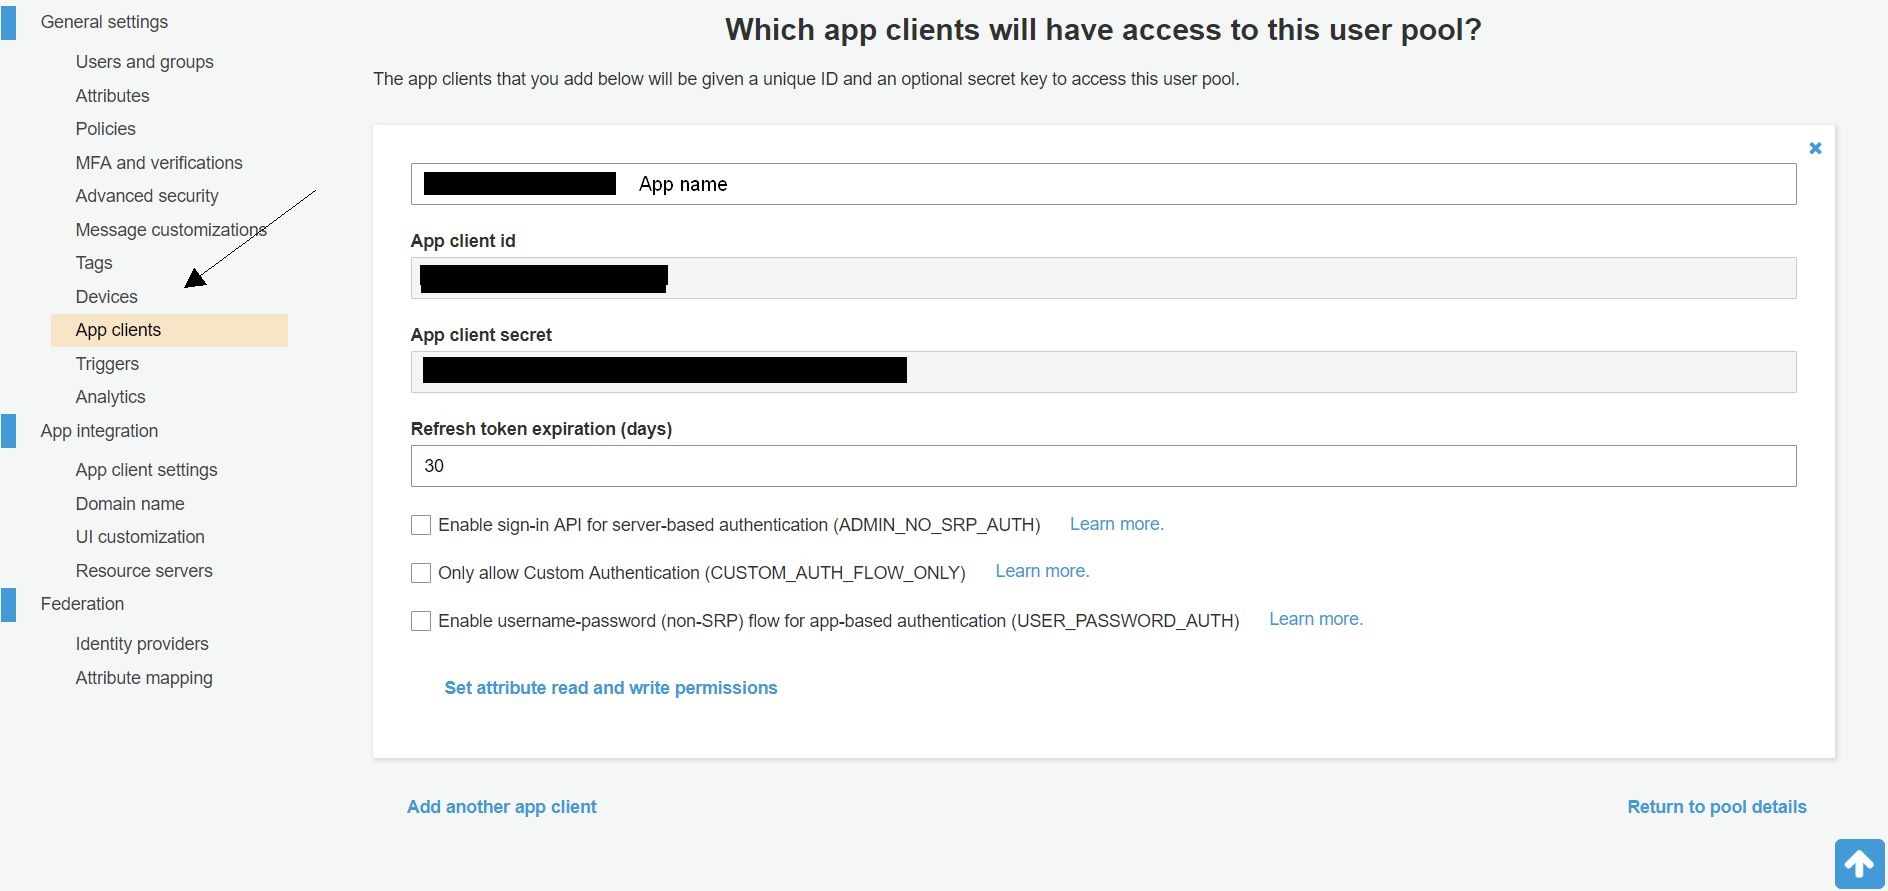
Important! in the step where you are asked “Which app clients will have access to this user pool?” click on “Add an app client”. Give your app a name, the deafult options are sufficient so you shouldn’t change anything.
Make sure you click on “Show Details” after you added your app and document the App client id and the App client secret. You will need them later on to interact with the Cognito API.

Optional: right after you add your app and click “next step”, you will have a chance to add functions triggered by the various steps of the authentication flow. If you know what AWS Lambda functions are (and you defined such functions in your account) you can choose to trigger them depending on the authentication flow.
Complete the wizard and create your user pool.
Email communications
You must have the AWS SES (simple email service) configured properly, in order for the registration of new users and “forgot password” flows to work. By default, SES is in sandbox mode, which means you can only register users with pre-verified emails. Defining SES is outside the scope of this guide, but note that you have to open a ticket in the AWS support center, asking for these privilleges.
Make sure you supply AWS support with a lot of information about how you make sure emails don’t bounce, and about spam prevention. Even though it’s trivial, since this is an internal AWS system using the email service, they made me jump through hoops, untill granting me a 50k daily email cap, which is more than enough for me.
App client settings
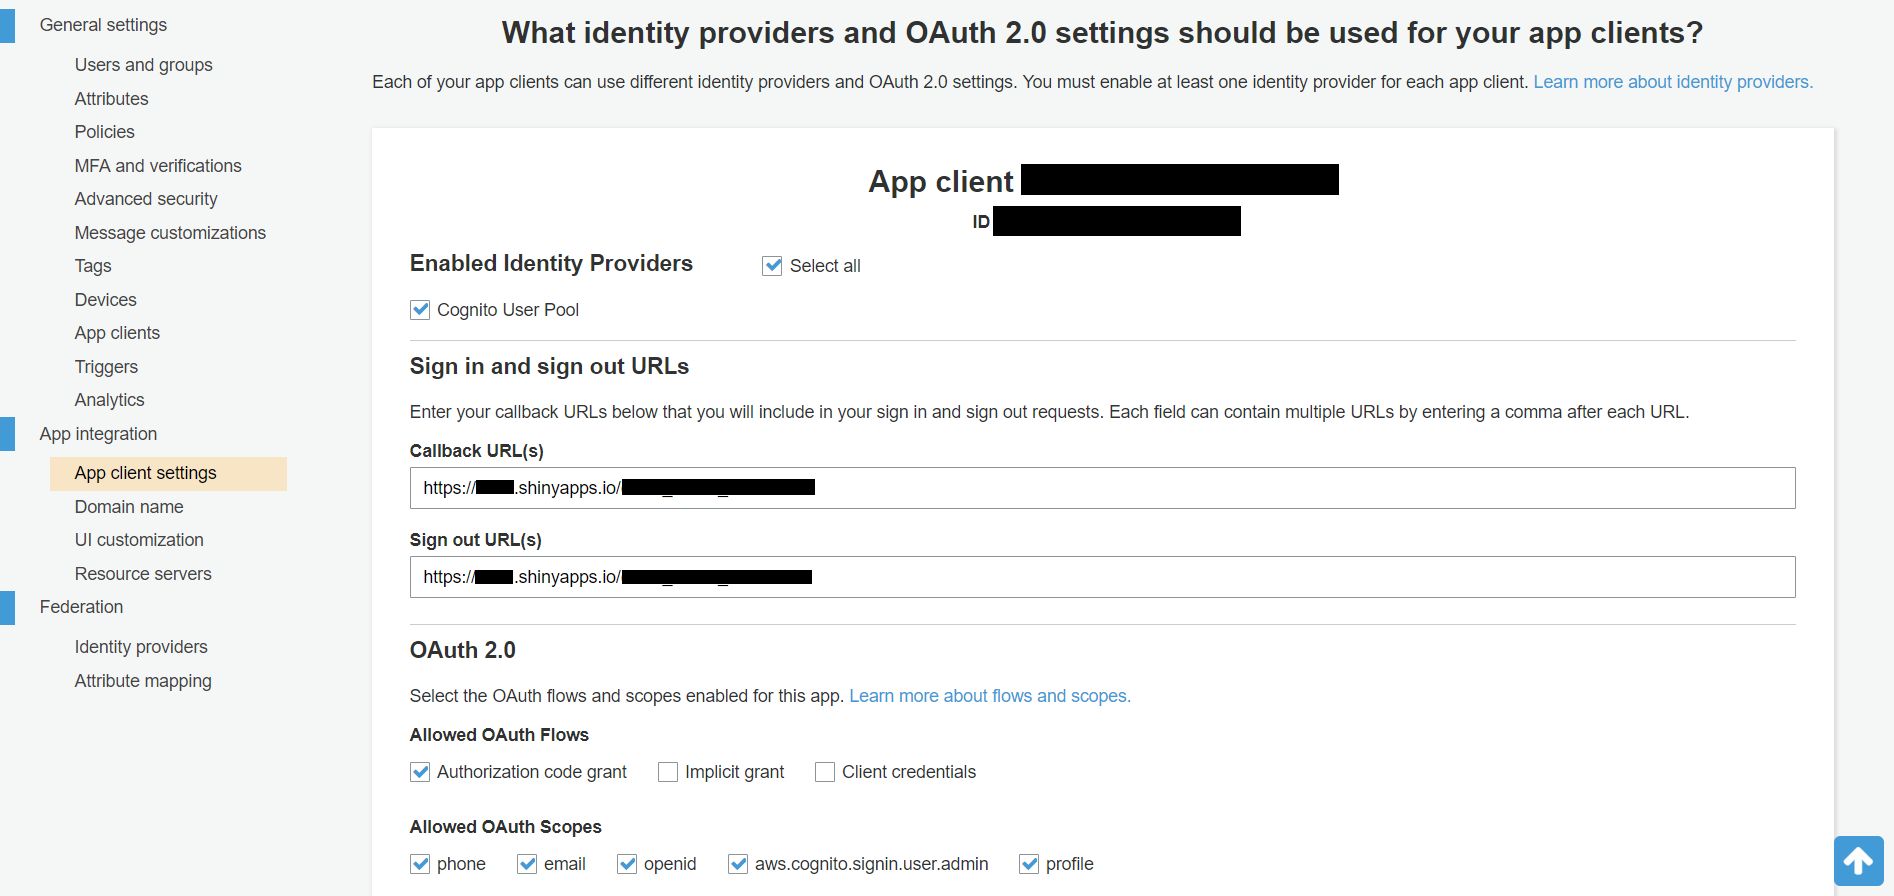
Under the “App integration -> App client settings” you need to add the Callback URL of your app (where the user is directed upon login). For example, if your app is going to be hosted on shinyapps.io that would be: https://YOUR_USER_NAME.shinyapps.io/YOUR_APP_NAME. Your sign-out url can be the same, if you want the app to allow the user to restart the login, or a different page showing that the user has logged out.
Under OAuth 2.0/“Allowed OAuth Flows” you should check the: Authorization code grant. This is the authentication flow we are going to use for our shiny app. The “implicit grant” is not as secure, and the “client credentials” is used for machine-to-machine authentication.
Under “Allowed OAuth Scopes” check the options by which you are going to recognize your users within the shiny app’s logic. I.e., if you are going to show specific data by the user’s email address than make sure you check the “email” under allowed OAuth scopes.
Set a domain name for your login screen and customize the UI of the login screen if you wish.
You can see in the following screenshot, that I’m using this authentication with one of my apps hosted in a shinyapps.io domain, under my account.

Enable identity provides (Optional)
If you want to offer your users a social login such as Facebook or Google, you would need to issue the proper credentials via google console and facebook. This is a nice addition, but is out of the scope of this guide.
Finally, we get into the R code part of this post.
Step 3: define your Shiny app’s server.r and ui.r
In our shiny app, we need to pull the code and use the retrieve_user_data function we’ve just defined as part of our verification of the user. Here is the code we will use for this. This should go into the server.r file.
library(shiny)
library(shinyjs)

# define a tibble of allwed users (this can also be read from a local file or from a database)
allowed_users <- tibble(
  user_email = c("user1@example.com",
                 "user2@example.com"))

function(input, output, session){

   # initialize authenticated reactive values ----
   # In addition to these three (auth, name, email)
   # you can add additional reactive values here, if you want them to be based on the user which logged on, e.g. privileges.
   user <- reactiveValues(auth = FALSE, # is the user authenticated or not
                          name = NULL, # user's name as stored and returned by cognito
                          email = NULL)  # user's email as stored and returned by cognito

   # get the url variables ----
   observe({
        query <- parseQueryString(session$clientData$url_search)
        if (!("code" %in% names(query))){
            # no code in the url variables means the user hasn't logged in yet
            showElement("login")
        } else {
            current_user <- retrieve_user_data(query$code)
            # if an error occurred during login
            if (is.null(current_user)){
                hideElement("login")
                showElement("login_error_aws_flow")
                showElement("submit_sign_out_div")
                user$auth <- FALSE
            } else {
                # check if user is in allowed user list
                # for more robustness, use stringr::str_to_lower to avoid case sensitivity
                # i.e., (str_to_lower(current_user$email) %in% str_to_lower(allowed_users$user_email))
                if (current_user$email %in% allowed_users$user_email){
                    hideElement("login")
                    showElement("login_confirmed")
                    showElement("submit_sign_out_div")

                    user$auth <- TRUE
                    user$email <- current_user$email
                    user$name <- current_user$name

                    # ==== User is valid, continue prep ====

                    # show the welcome box with user name
                    output$confirmed_login_name <-
                        renderText({
                            paste0("Hi there!, ",
                                    user$name)
                        })

                    # ==== Put additional login dependent steps here (e.g. db read from source) ====

                    # ADD HERE YOUR REQUIRED LOGIC
                    # I personally like to select the first tab for the user to see, i.e.:
                    showTab("main_navigation", "content_tab_id", select = TRUE)
                    # (see the next chunk for how this tab is defined in terms of ui elements)

                    # ==== Finish loading and go to tab ====

                } else {
                    # user not allowed. Only show sign-out, perhaps also show a login error message.
                    hideElement("login")
                    showElement("login_error_user")
                    showElement("submit_sign_out_div")
                }
            }
        }
    })

   # This is where you will put your actual elements (the server side that is) ----
   # For example:

    output$some_plot <- renderPlot({
        # *** THIS IS EXTREMELY IMPORTANT!!! ***
        validate(need(user$auth, "No privileges to watch data. Please contact support."))
        # since shinyjs is not safe for hiding content, make sure that any information is covered
        # by the validate(...) expression as was specified.
        # Rendered elements which were not preceded by a validate expression can be viewed in the html code (even if you use hideElement).

        # only if user is confirmed the information will render (a plot in this case)
        plot(cars)
    })
}
The accompanying user interface (ui.r) will look like the following:
library(shiny)
library(shinyjs)

fluidPage(
    useShinyjs(), # to enable the show/hide of elements such as login and buttons
    hidden( # this is how the logout button will like:
        div(
            id = "submit_sign_out_div",
            a(id = "submit_sign_out",
              "logout",
              href = aws_auth_logout,
              style = "color: black;
              -webkit-appearance: button;
              -moz-appearance: button;
              appearance: button;
              text-decoration: none;
              background:#ff9999;
              position: absolute;
              top: 0px; left: 20px;
              z-index: 10000;
              padding: 5px 10px 5px 10px;"
              )
            )
    ),
    navbarPage(
        "Cognito auth example",
        id = "main_navigation",
        tabPanel(
            "identification",
            value = "login_tab_id",
            h1("Login"),
            div(
                id = "login",
                p("To login you must identify with a username and password"),
                # This defines a login button which upon click will redirect to the AWS Cognito login page
                a(id = "login_link",
                  "Click here to login",
                  href = aws_auth_redirect,
                  style = "color: black;
                  -webkit-appearance: button;
                  -moz-appearance: button;
                  appearance: button;
                  text-decoration: none;
                  background:#95c5ff;
                  padding: 5px 10px 5px 10px;")
            ),
            hidden(div(
                id = "login_error_aws_flow",
                p("An error has occurred."),
                p("Please contact support")
            )),
            hidden(
                div(
                    id = "login_confirmed",
                    h3("User confirmed"),
                    fluidRow(
                        textOutput("confirmed_login_name")),
                    fluidRow(
                        p("Use the menu bar to navigate."),
                        p(
                            "Don't forget to logout when you want to close the system."
                        )
                    )
                )
            ),
        ),
        tabPanel("Your actual content",
                 value = "content_tab_id",
                 fluidRow(plotOutput("some_plot")))
    )
)
Conclusions
The post contains essential things you need in order to get started with AWS Cognito authentication for your shiny apps.
You can extend this process to any authentication service (for example, digital ocean has a similar service to Cognito). There are some packages which implement the entire process for other services, like googleAuthR for a gmail login see this link.
If you found this post useful, let me know!, either in comments below, or twitter, or email.
As always, be careful of how you implement this process in your own apps, to make sure there are no security risks or loopholes. Also, DISCLAIMER: The information in this post is free, you can use this however like. Note that it is published with the hope that it will be useful, but WITHOUT ANY WARRANTY; without even the implied warranty of MERCHANTABILITY or FITNESS FOR A PARTICULAR PURPOSE.